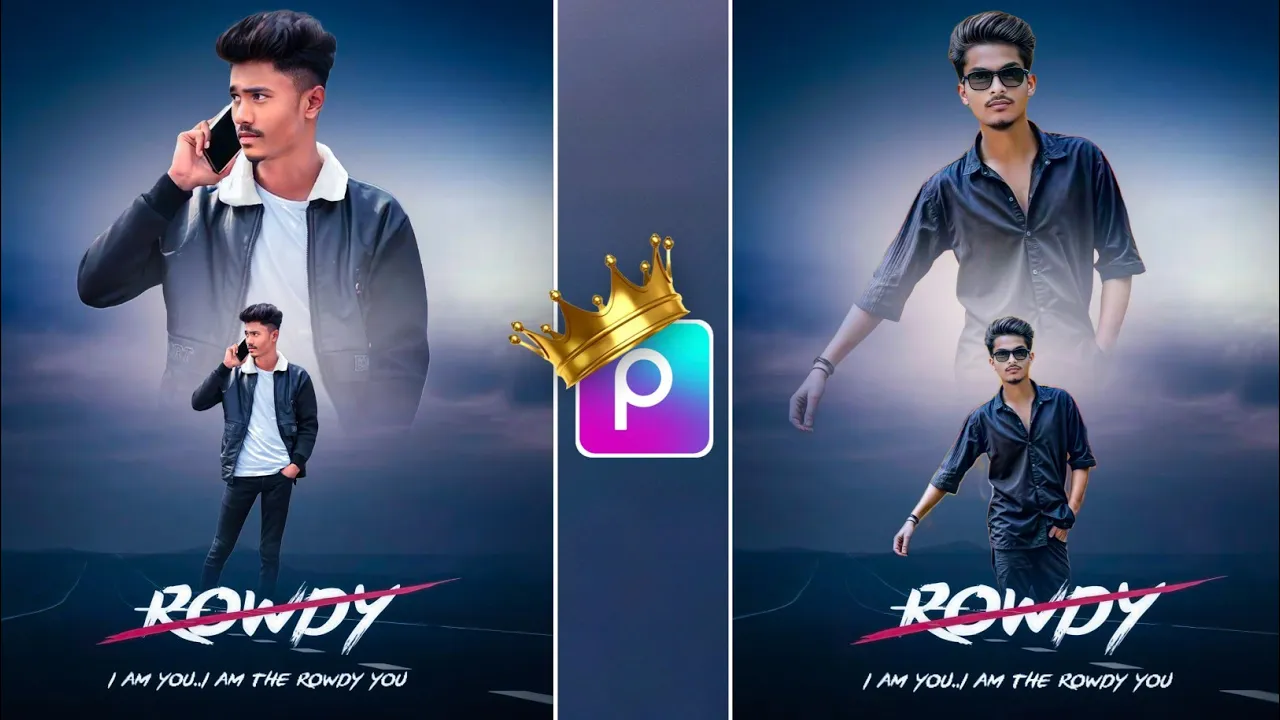
How to Create Trending Dual Photo Editing in PicsArt App (Step-by-Step Tutorial)
Hello guys! How are you all doing? In today’s tutorial, I’m going to show you how to create this trending dual photo editing effect using the PicsArt App. This editing style is going viral across social media, and you can easily make your photos look professional and aesthetic to grab tons of likes on Instagram, Facebook, or any other platform.
You can also use this type of photo as your social media profile picture or share it as a creative post. The process is super simple — I’ll explain every step clearly, so make sure to read till the end!
Step 1: Install and Open PicsArt
First, make sure you have the PicsArt application installed on your device. If you don’t, go to the Google Play Store and install it for free.
Once installed, open the app. You’ll see the main interface — simply tap on the “+” (plus) button to start a new project.
Step 2: Choose and Add Background
Now, click on “Edit a Photo” and choose a background for your edit. You can use any style you like — aesthetic, cinematic, or minimal — but to make things easier, I’ve shared a free background download link in the description of the video or blog.
Once you select your background image, it will load onto your editing screen. You can use this same technique for any background type — you’re not limited to just one style.
Step 3: Add Your Photo
Scroll down and tap on the “Add Photo” option. Now, select the image you want to edit. Once you’ve added your image, adjust the size so that it fits well on your background.
Next, tap on “Remove BG” (Remove Background). PicsArt will automatically remove your photo’s background with amazing accuracy — no manual work needed. This gives your image a clean, professional look.
After the background is removed, increase or decrease the size according to your design preference.
Step 4: Add Shadow for a Realistic Look
To make the image look more realistic, add a shadow effect. Select your image and tap on “Shadow”. Adjust the blur, opacity, and position until it looks natural. Usually, setting horizontal to 0 and moving the vertical shadow slightly downward gives a cinematic depth.
Step 5: Duplicate the Image (Creating the Dual Effect)
Now comes the main part — the dual photo effect.
Simply duplicate your photo. You can do this by adding the same image again using the “Add Photo” option and removing the background once more.
After removing the background again, place this second image behind the first one to create a double-layered look. To do that, tap on the “Layer” option, long-press the new image, and drag it below the first image.
Next, use the Eraser tool to softly erase the lower part of the duplicate photo. Reduce hardness and opacity to create a faded shadow-like effect — this gives a 3D depth to your design.
Step 6: Add PNG Overlays for Extra Style
To make your edit look even more trendy, add a PNG overlay. Click the “+” icon → choose “Add Photo” → and select a stylish PNG (such as light flares, smoke, or texture overlays). You can download free PNG overlays from Freepik or PNGTree.
Once added, go to the Blend option and choose “Screen” mode to remove any black background and blend it seamlessly with your image. Adjust its position wherever it looks best.
Step 7: Final Color Adjustments
Finally, go to Tools → Adjust to give your photo a professional finishing touch. Here’s what to tweak:
- Saturation: Increase slightly for vibrant colors.
- Clarity: Boost a little to add sharpness.
- Temperature: Adjust for a cinematic tone — a bit warmer often looks better.
- Shadows: Decrease slightly to enhance contrast.
Once done, tap “Apply” or “Done”. You’ll notice your photo now looks completely professional — perfect for Instagram reels, YouTube thumbnails, or personal branding.
Step 8: Save Your Edit
After everything looks perfect, tap the “Save” button at the top right corner. Your dual photo edit will now be saved in your device gallery, ready to upload!
You can post it on Instagram, Facebook, or Pinterest to attract more engagement.
Conclusion
So that’s how you can easily create trending dual photo edits using the PicsArt app. We covered everything from adding a background to layering, shadow effects, and final color adjustments — all in a few simple steps.
If you follow these steps carefully, you can design eye-catching photos that look like professional edits — all directly from your mobile phone!
I hope you found this tutorial helpful. If you did, don’t forget to share it with your friends and check out PicsArt’s official blog for more creative ideas.
See you in the next post! Until then, stay creative and keep spreading happiness! 😊

📢 Join Our WhatsApp Channel
Get daily AI photo editing prompts, tools, and tips directly on your phone.
Join Now on WhatsApp 🚀